With enhancement in technology, automation has become a need whether it is home, office or some other place. At home we come across many appliances be it fan, AC, TV, lights, etc. What if you could operate all of them with the Android Phone you’re holding in your hand.

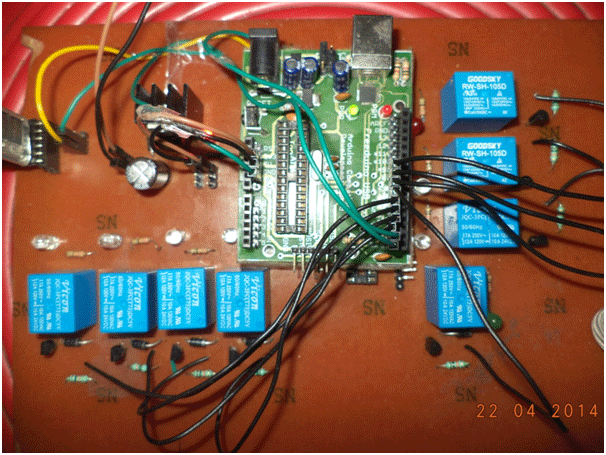
Fig. 1: Prototype of Android Mobile controlled Home Automation System
This project aims to incorporate android phone control over electrical appliances. We use Bluetooth communication between Android phone and a Receiver (control unit) that is connected to the appliances.
Bluetooth is a wireless technology standard for exchanging data over short distances (using short-wavelength UHF radio waves in the ISM band from 2.4 to 2.485 GHz) from fixed and mobile devices and building personal area networks (PANs). Invented by telecom vendor Ericsson in 1994, it was originally conceived as a wireless alternative to RS-232 data cables. It can connect several devices, overcoming problems of synchronization.
HC-05 module is an easy to use Bluetooth SPP (Serial Port Protocol) module, designed for transparent wireless serial connection setup. It contains 6 pins that are labelled on the back but most modules only have 4 of those populated with pogo pins. KEY & STATE are not required, as KEY is used for flashing the device and STATE simply indicates whether the device is awake or not. So that leaves only GND, VCC, TXD, RXD.
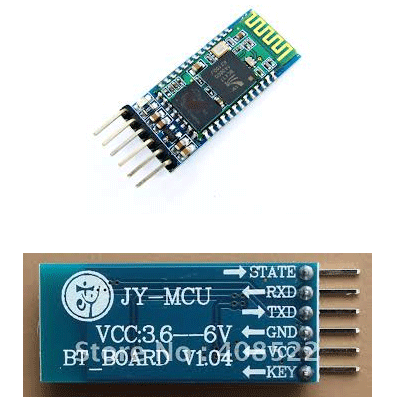
Fig. 2: Typical image of HC-05 Bluetooth Module
For connecting the module with Arduino , we need to use the Serial (Tx and Rx) pins provided on the board.
Making Connections with HC-05:
Some modules have VCC labelled for working voltages up to ~6 volts. These modules DO NOT like anything except 3.3 volts on the VCC line. We should use a level converter to 3.3V on the RXD line. Use two resistors, as a simple voltage divider to make the TTL level conversion. Wire one 2.2k ohm resistor to ground and another 1k ohm resistor to the TXD line on the MCU. Connect the RXD pin in between the two resistors for an output of approx 3.4 volts.
Connect RXD pin of module to TXD of Arduino (Digital Pin 1), through the voltage divider configuration shown below:
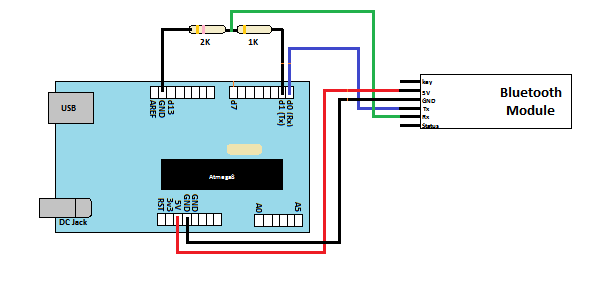
Fig. 3: Image showing circuit connections of Arduino Uno and HC-05 Bluetooth Module
Now connect TXD of module to RXD of Arduino (Digital Pin 0).To operate the appliances, we can’t connect them directly to Arduino. We need something called RELAY which is driven with the help of Transistor based driver circuit.
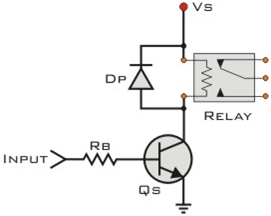
Fig. 4: Circuit Diagram of Transistor based Relay Driver
The ‘Input’ is from Arduino I/O pin. RB is the current limiting resistor at the base of the transistor. Its value is typically 10K Ohm. ‘VS’ is the supply voltage needed to trigger the Relay coil (It depends on the Relay rating). A diode is connected in Reverse in parallel to the relay. This is done to avoid the back e.m.f. generated by coil that can damage the transistor or the Arduino.
A simplified Block diagram of the complete system is shown below:
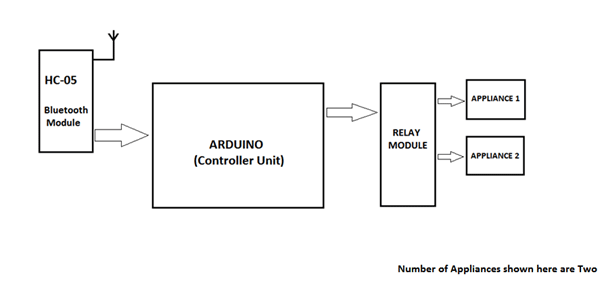
Fig. 5: Block Diagram of Android Mobile controlled Home Automation System
After making above connections, you’ll see blinking led on the module. This just ensures your device is powered properly. After that pick your Android Phone, and get the App- “Arduino Bluetooth Terminal” from the Google Play Store. This app is available for free, and is easy to use.
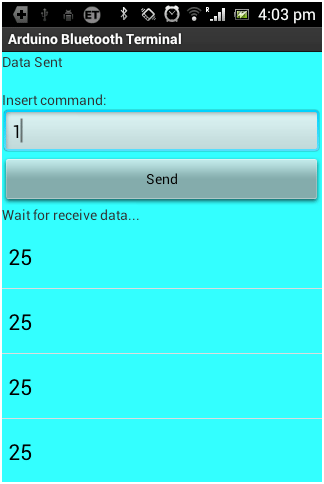
Fig. 6: Screenshot of Android App used to control Home Appliances
After installation, turn ON Bluetooth of phone. Now search for devices until you find HC-05 and then start pairing with it. Enter Password 1234, when asked.
If properly paired, the LED blinking on Bluetooth module will stop. If not check the connections again. Get back to the app you just downloaded. It’ll automatically find the device, match the key it displays, and start conversation. Make sure, the phone’s Bluetooth remains ON.

Fig. 7: Image showing complete prototype of Arduino based Android phone controlled Home Automation System
System Operation:
When we send ‘1’ to the Arduino, the Appliance 1 connected to Arduino Turns ON and when ‘2’ is sent, Appliance 2 turns ON. The serial data is read by Arduino, through Serial.read () function and is stored in the integer type variable state declared in the program. After this in the loop(), we just compare state value with 1, 2, 3 and so on till 8 to check the ON condition of 8 Appliances. Then we compare state value with a, b, c and so on till h to check the OFF condition of appliances and perform respective operation.
In addition to this we can also monitor the physical state such as temperature, pressure, etc., through the android phone. Say, we need to monitor the temperature of the room. We connect the LM35 Temperature sensor to the Arduino. Now read the sensor value and send it to the phone via serial link established over Bluetooth between the phone and Arduino.
### int led1 = 2; int led2 = 3; int led3 = 4; int led4 = 5; int led5 = 6; int led6 = 7; int led7 = 8; int led8 = 9; int state; int flag=0; void setup() < pinMode(led1, OUTPUT); pinMode(led2, OUTPUT); pinMode(led3, OUTPUT); pinMode(led4, OUTPUT); pinMode(led5, OUTPUT); pinMode(led6, OUTPUT); pinMode(led7, OUTPUT); pinMode(led8, OUTPUT); Serial.begin(9600); >void loop() < if(Serial.available() >0) < state = Serial.read(); flag=0; >if (state == '1') < digitalWrite(led1, HIGH); if(flag == 0)< Serial.println("Appliance 1 is ON"); flag=1; >> else if (state == '2') < digitalWrite(led2, HIGH); if(flag == 0)< Serial.println("Appliance 2 is ON"); flag=1; >> else if (state == '3') < digitalWrite(led3, HIGH); if(flag == 0)< Serial.println("Appliance 3 is ON"); flag=1; >> else if (state == '4') < digitalWrite(led4, HIGH); if(flag == 0)< Serial.println("Appliance 4 is ON"); flag=1; >> else if (state == '5') < digitalWrite(led5, HIGH); if(flag == 0)< Serial.println("Appliance 5 is ON"); flag=1; >> else if (state == '6') < digitalWrite(led6, HIGH); if(flag == 0)< Serial.println("Appliance 6 is ON"); flag=1; >> else if (state == '7') < digitalWrite(led7, HIGH); if(flag == 0)< Serial.println("Appliance 7 is ON"); flag=1; >> else if (state == '8') < digitalWrite(led8, HIGH); if(flag == 0)< Serial.println("Appliance 8 is ON"); flag=1; >> else if (state == 'a') < digitalWrite(led1, LOW); if(flag == 0)< Serial.println("Appliance 1 is OFF"); flag=1; >> else if (state == 'b') < digitalWrite(led2, LOW); if(flag == 0)< Serial.println("Appliance 2 is OFF"); flag=1; >> else if (state == 'c') < digitalWrite(led3, LOW); if(flag == 0)< Serial.println("Appliance 3 is OFF"); flag=1; >> else if (state == 'd') < digitalWrite(led4, LOW); if(flag == 0)< Serial.println("Appliance 4 is OFF"); flag=1; >> else if (state == 'e') < digitalWrite(led5, LOW); if(flag == 0)< Serial.println("Appliance 5 is OFF"); flag=1; >> else if (state == 'f') < digitalWrite(led6, LOW); if(flag == 0)< Serial.println("Appliance 6 is OFF"); flag=1; >> else if (state == 'g') < digitalWrite(led7, LOW); if(flag == 0)< Serial.println("Appliance 7 is OFF"); flag=1; >> else if (state == 'h') < digitalWrite(led8, LOW); if(flag == 0)< Serial.println("Appliance 8 is OFF"); flag=1; >> > ###Circuit Diagrams
Project Video
Filed Under: Electronic Projects
Tagged With: ac, android, Arduino, bluetooth
Questions related to this article?
👉Ask and discuss on Electro-Tech-Online.com and EDAboard.com forums.You must be logged in to post a comment.
EXPAND YOUR KNOWLEDGE AND STAY CONNECTED Get the latest info on technologies, tools and strategies for EE professionals.EE TECH TOOLBOX
Tech Toolbox: Automotive Electronics
Drive into the world of automotive electronics engineering with these tutorials, designed to address automotive design and engineering challenges. Add this tech toolbox to your practical knowledge library and stay updated on the rapid-fire advancements driving new innovations.
EE Learning Center
BROWSE CLASSROOMS Browse Design Guides EXPAND YOUR KNOWLEDGE AND STAY CONNECTED Get the latest info on technologies, tools and strategies for EE professionals.
HAVE A QUESTION?
Have a technical question about an article or other engineering questions? Check out our engineering forums EDABoard.com and Electro-Tech-Online.com where you can get those questions asked and answered by your peers!
EDABOARD.com Discussions
